Deploy a Rails App with AWS OpsWorks
Follow these 11 (fairly) easy steps.
Many of the Rails apps I build for my clients are custom, in-house tools with limited traffic. To keep costs down and maximize performance, I run everything (web app, database, background jobs) on a single server. Although Amazon OpsWorks is capable of managing applications running on multi-instance clusters, it is equally capable of setting up a single-server application. This post describes the steps I use to get a basic Rails app up and running on a single server.
1. Prepare your app
Add “unicorn” to the Gemfile
OpsWorks supports Apache/Passenger and Nginx/Unicorn. They are both good solutions but I prefer the simplicity and performance of Nginx. So for this project, we are using Nginx/Unicorn. Add “unicorn” to the project Gemfile.
group :production do
  gem 'unicorn'
end
Precompile assets on deployment
There are lots of ways to serve Rails assets in production. OpsWorks doesn’t provide any direct support for the Rails asset pipeline, leaving the solution up to you.
For a single-server applications, I prefer to precompile the assets on the server during
deployment and serve them with Nginx from public/assets. The precompile step can be run from a chef
deploy hook.
Create deploy/before_symlink.rb in your app and add the contents below.
# Precompile assets. Assets are compiled into shared/assets and shared between deploys.
rails_env = new_resource.environment["RAILS_ENV"]
shared_path = "#{new_resource.deploy_to}/shared"

# create shared directory for assets, if it doesn't exist
directory "#{shared_path}/assets" do
  mode 0770
  action :create
  recursive true
end

# symlink current deploy's asset folder to shared assets each deploy
link "#{release_path}/public/assets" do
  to "#{shared_path}/assets"
end

# precompile assets into public/assets (which is symlinked to shared assets folder)
execute "rake assets:precompile" do
  cwd release_path
  command "bundle exec rake assets:precompile"
  environment 'RAILS_ENV' => rails_env
end
Check in your changes and push them to the repo/branch you will deploy from.
2. Create a stack
An AWS stack is the container that houses all the other components (layers, instances, and apps) and allows you to manage them as a unit.
Login to the AWS management console and choose OpsWorks from the Services menu. Click “Add Your First Stack”. All settings can be left at their default except:
-
Name: Choose a name for your stack.
-
Default operating system: Choose
Ubuntu 14.04 LTSRails needs a Javascript runtime to precompile assets on the server. The Ubuntu nodejs package is the easiest way to install a Javascript runtime. -
Default SSH key: A SSH key is required to login to instances via SSH later. Follow these steps to create a new keypair and then select that keypair here.
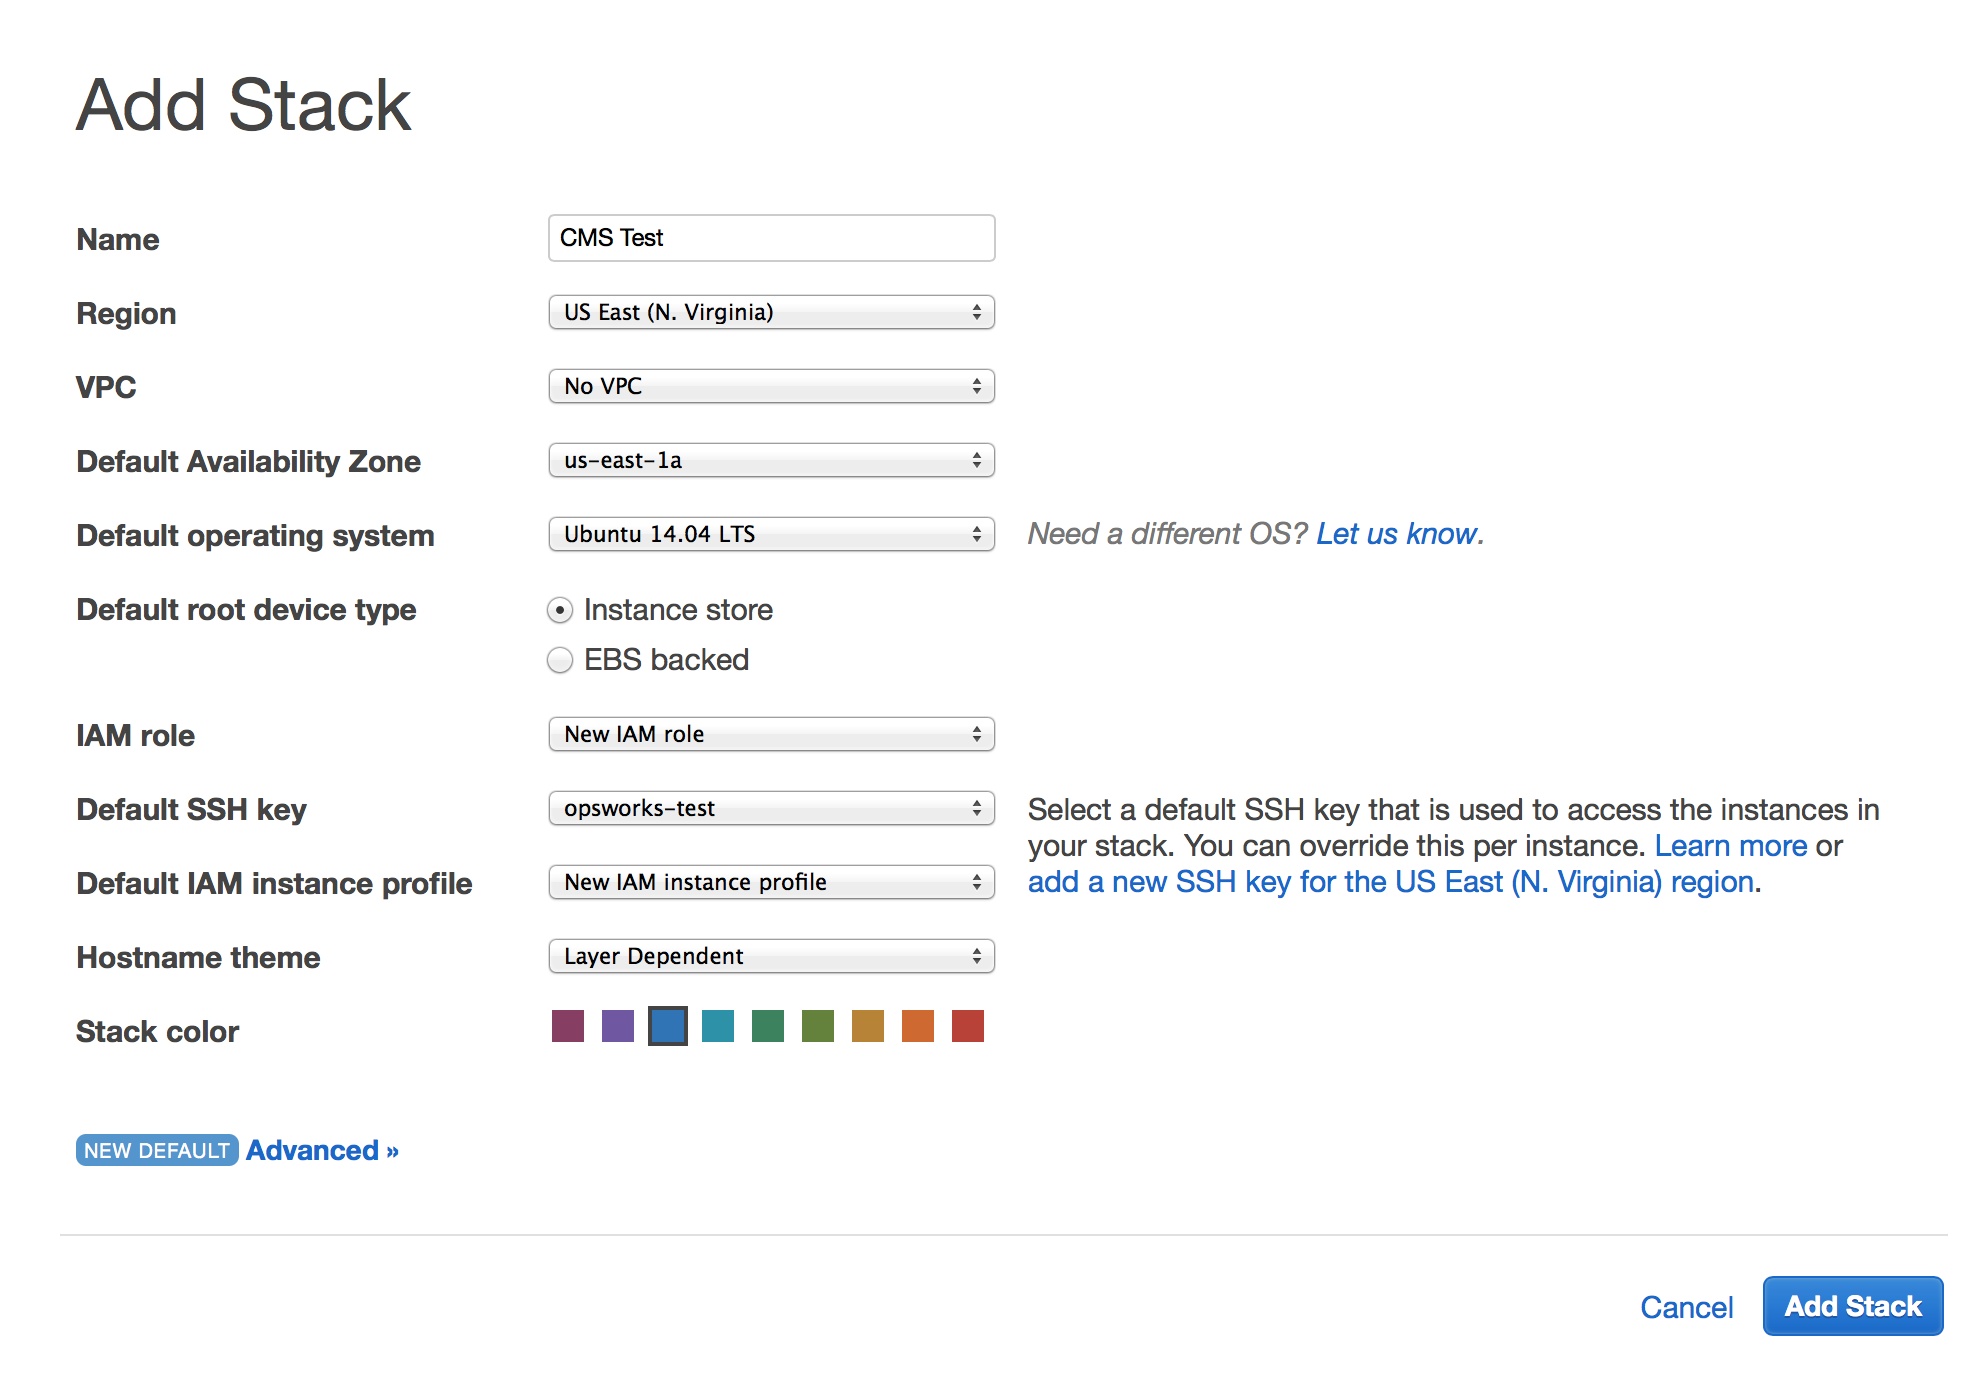
Click “Add Stack” to create the stack.
3. Create a “Rails App Server” layer
An OpsWorks layer is a collection of packages, scripts, and settings to configure an instance for a particular purpose (such as running a Rails app). In our case, we are going to create two layers: “Rails App Server” and “MySQL”. Both these layers will be assigned to the same instance, which creates a single server running the Rails app and a MySQL database.
Click “Add a layer” and choose Rails App Server as the layer type. Choose Nginx and Unicorn
as the rails stack. Leave all other settings at their default.
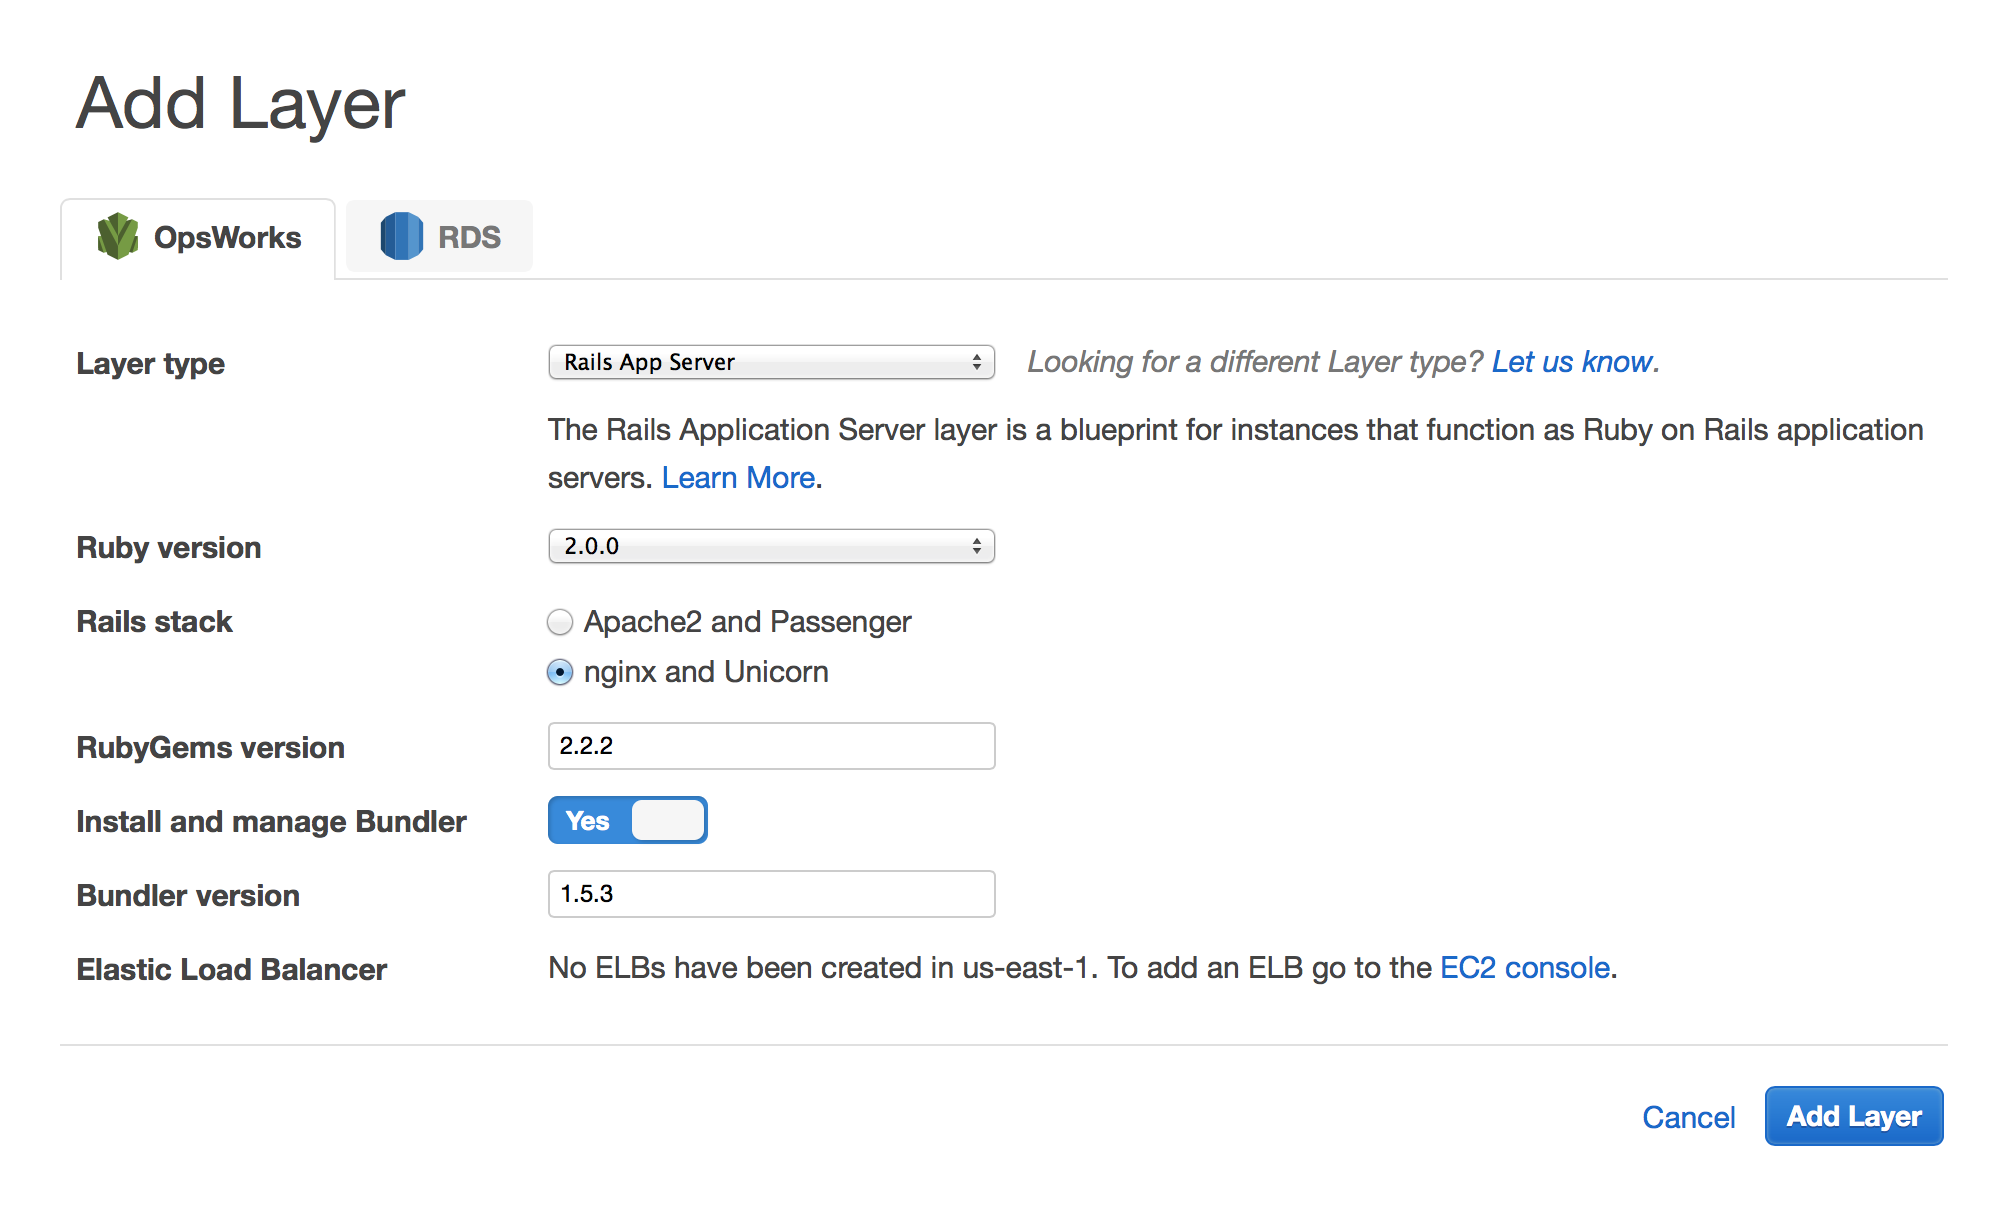
Click “Add Layer” to create the layer.
After creating the layer, we need to edit it to add the nodejs package. Click “Recipes” to
show the layer’s recipes. Then click “Edit”. Add the nodejs package under “OS Packages”.

Click “Save” to save your changes.
If your stack is running in a Virtual Private Cloud, you will need to configure the layer to allocate a public IP address. By default, instances created in a VPC don’t get a public IP. Click “Network”, then click “Edit” and enable “Elastic IP addresses”.
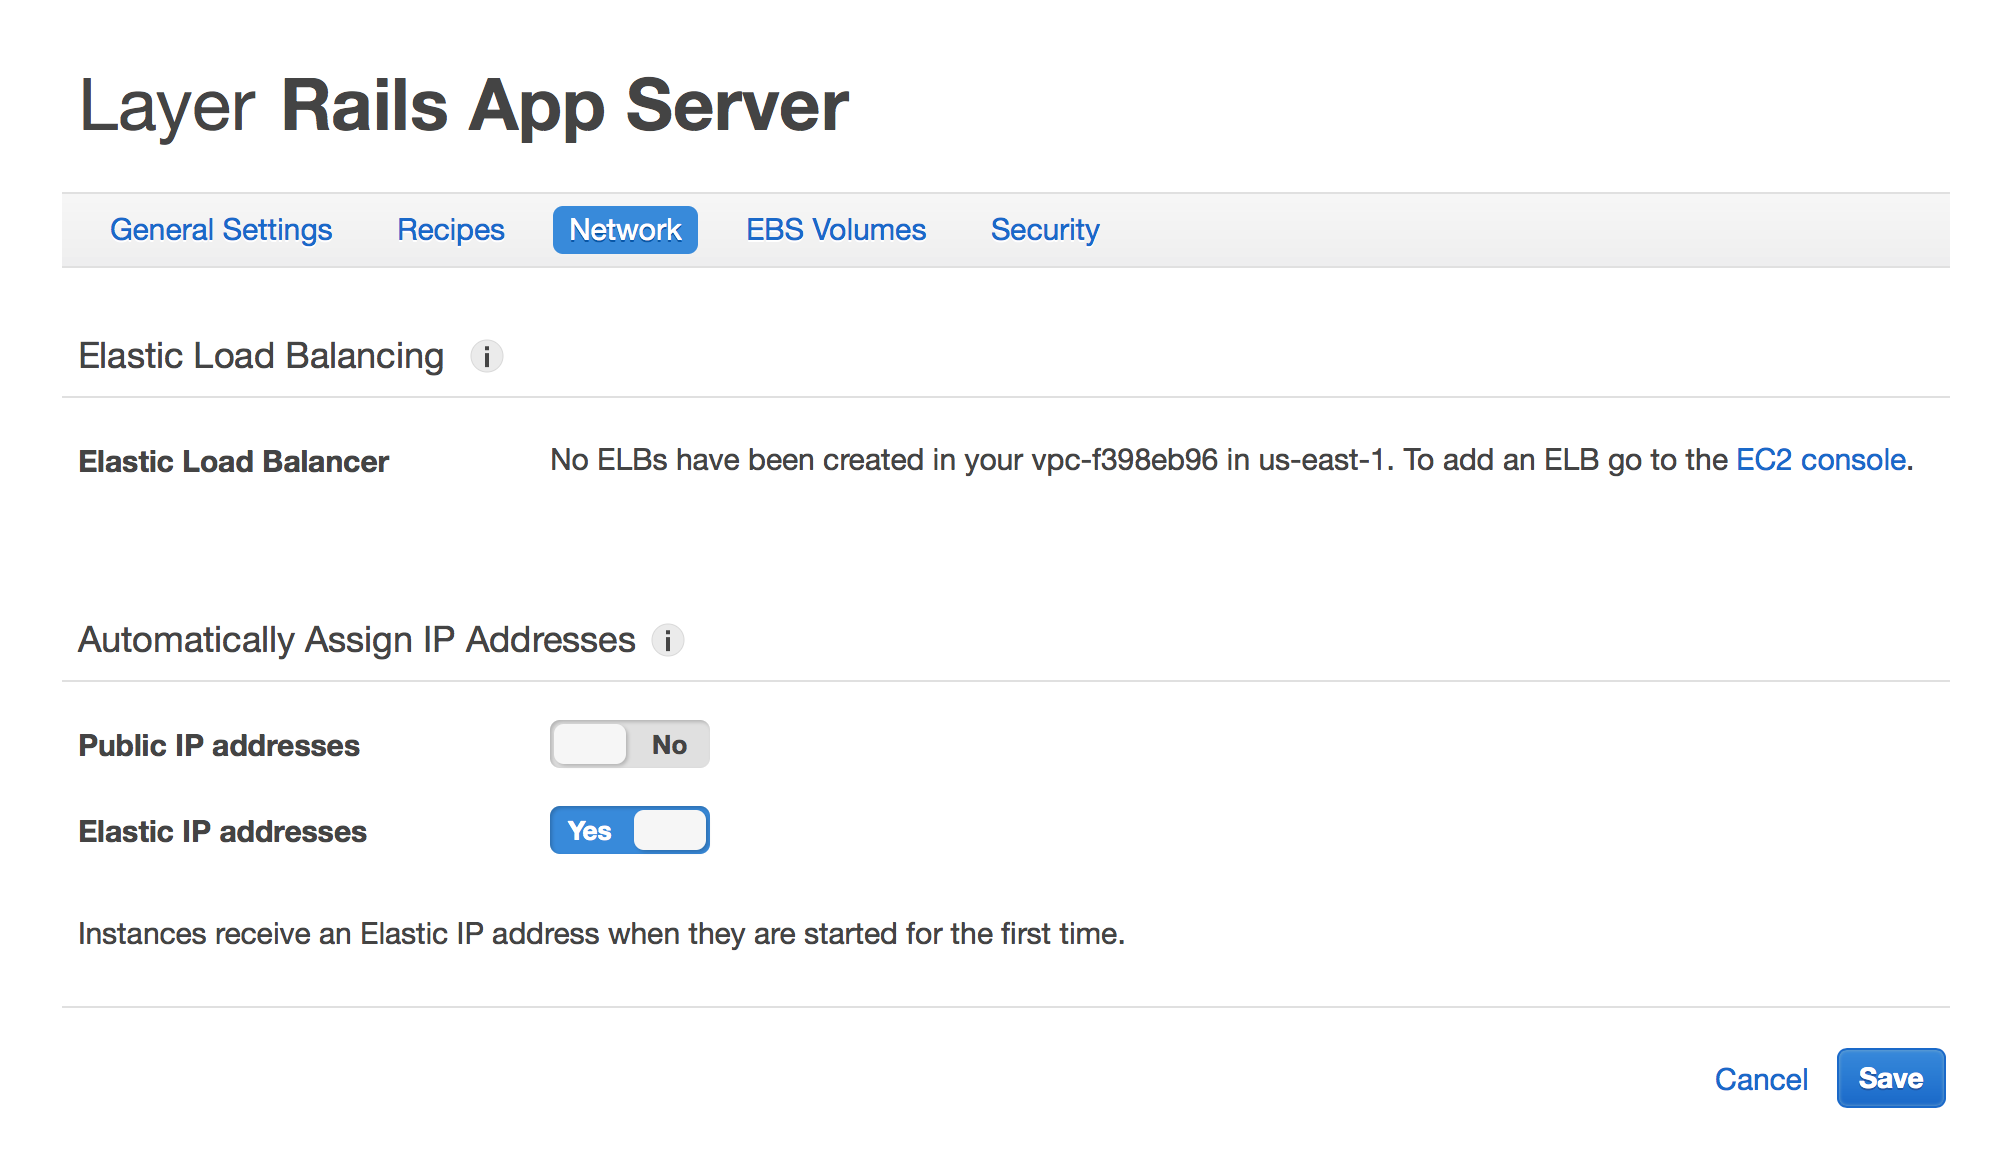
Click “Save” to save your changes.
4. Create a MySQL layer
Use the Navigation menu to go back to the Layers page. Add a new layer by clicking “+ Layer”
and choose MySQL as the layer type. Leave all settings as their default. You don’t need to
remember the MySQL root user password. OpsWorks will manage everything for you, including
creating your database.yml file.
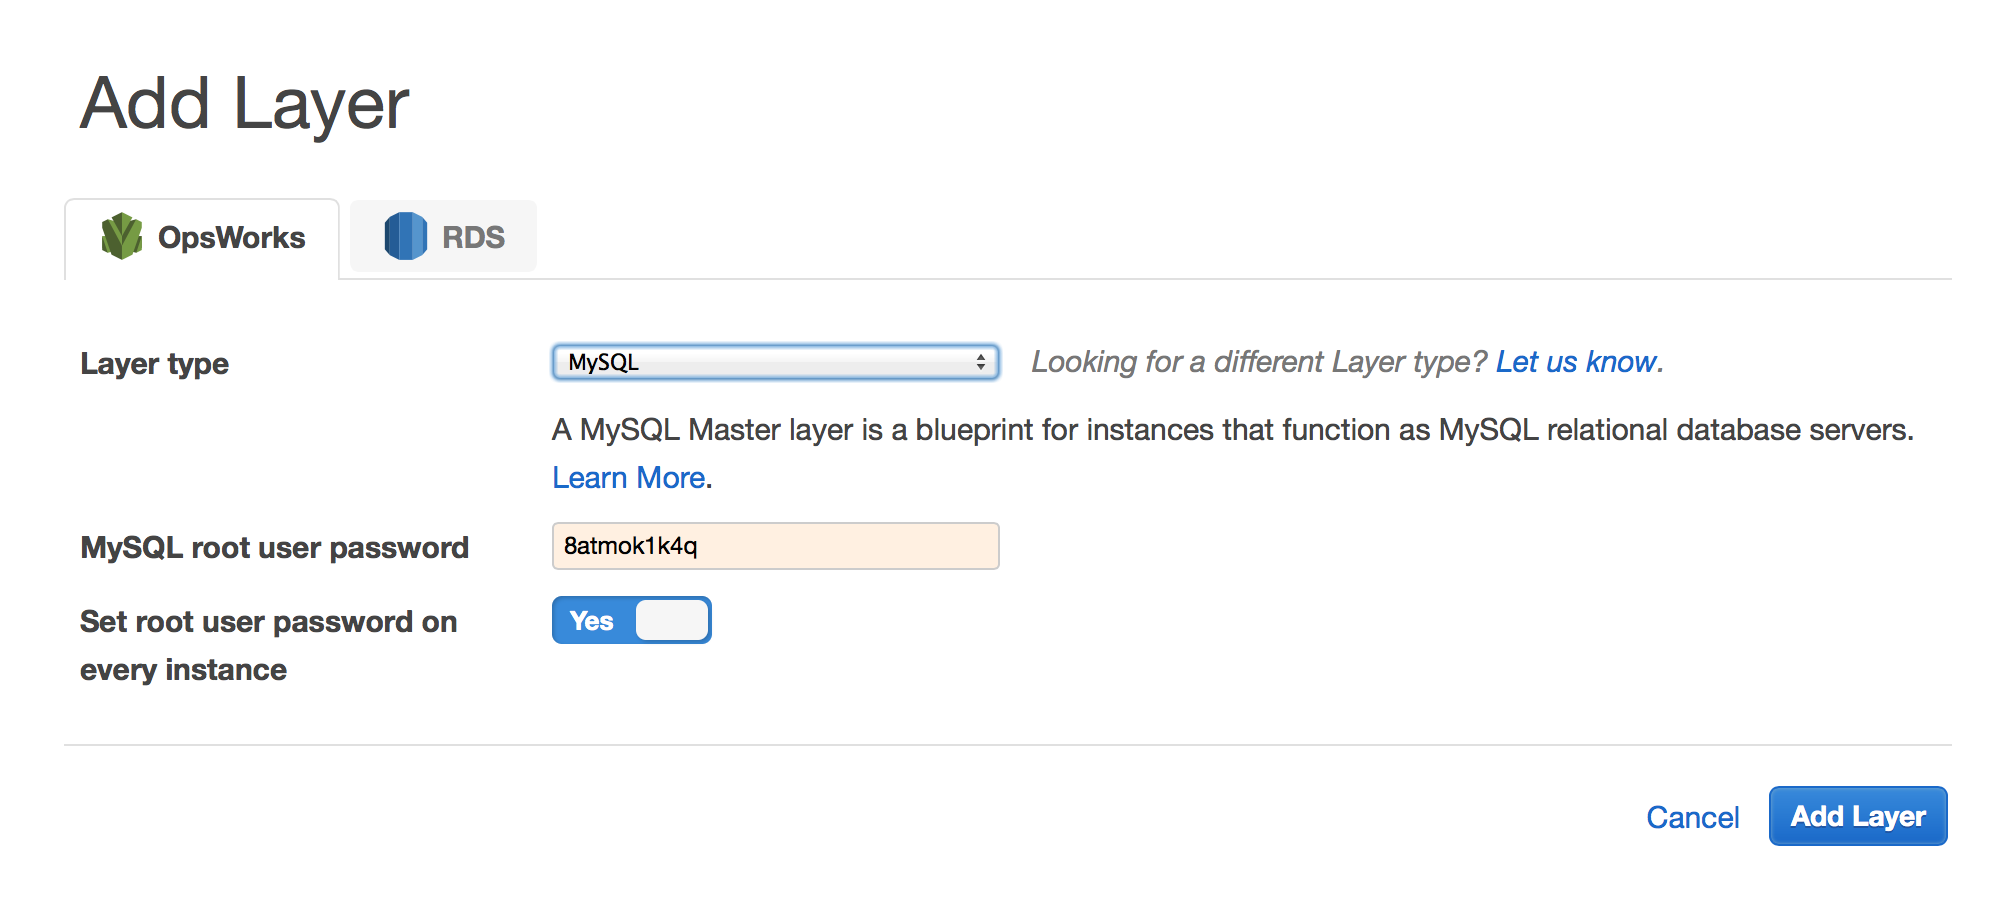
Click “Add Layer” to create the layer.
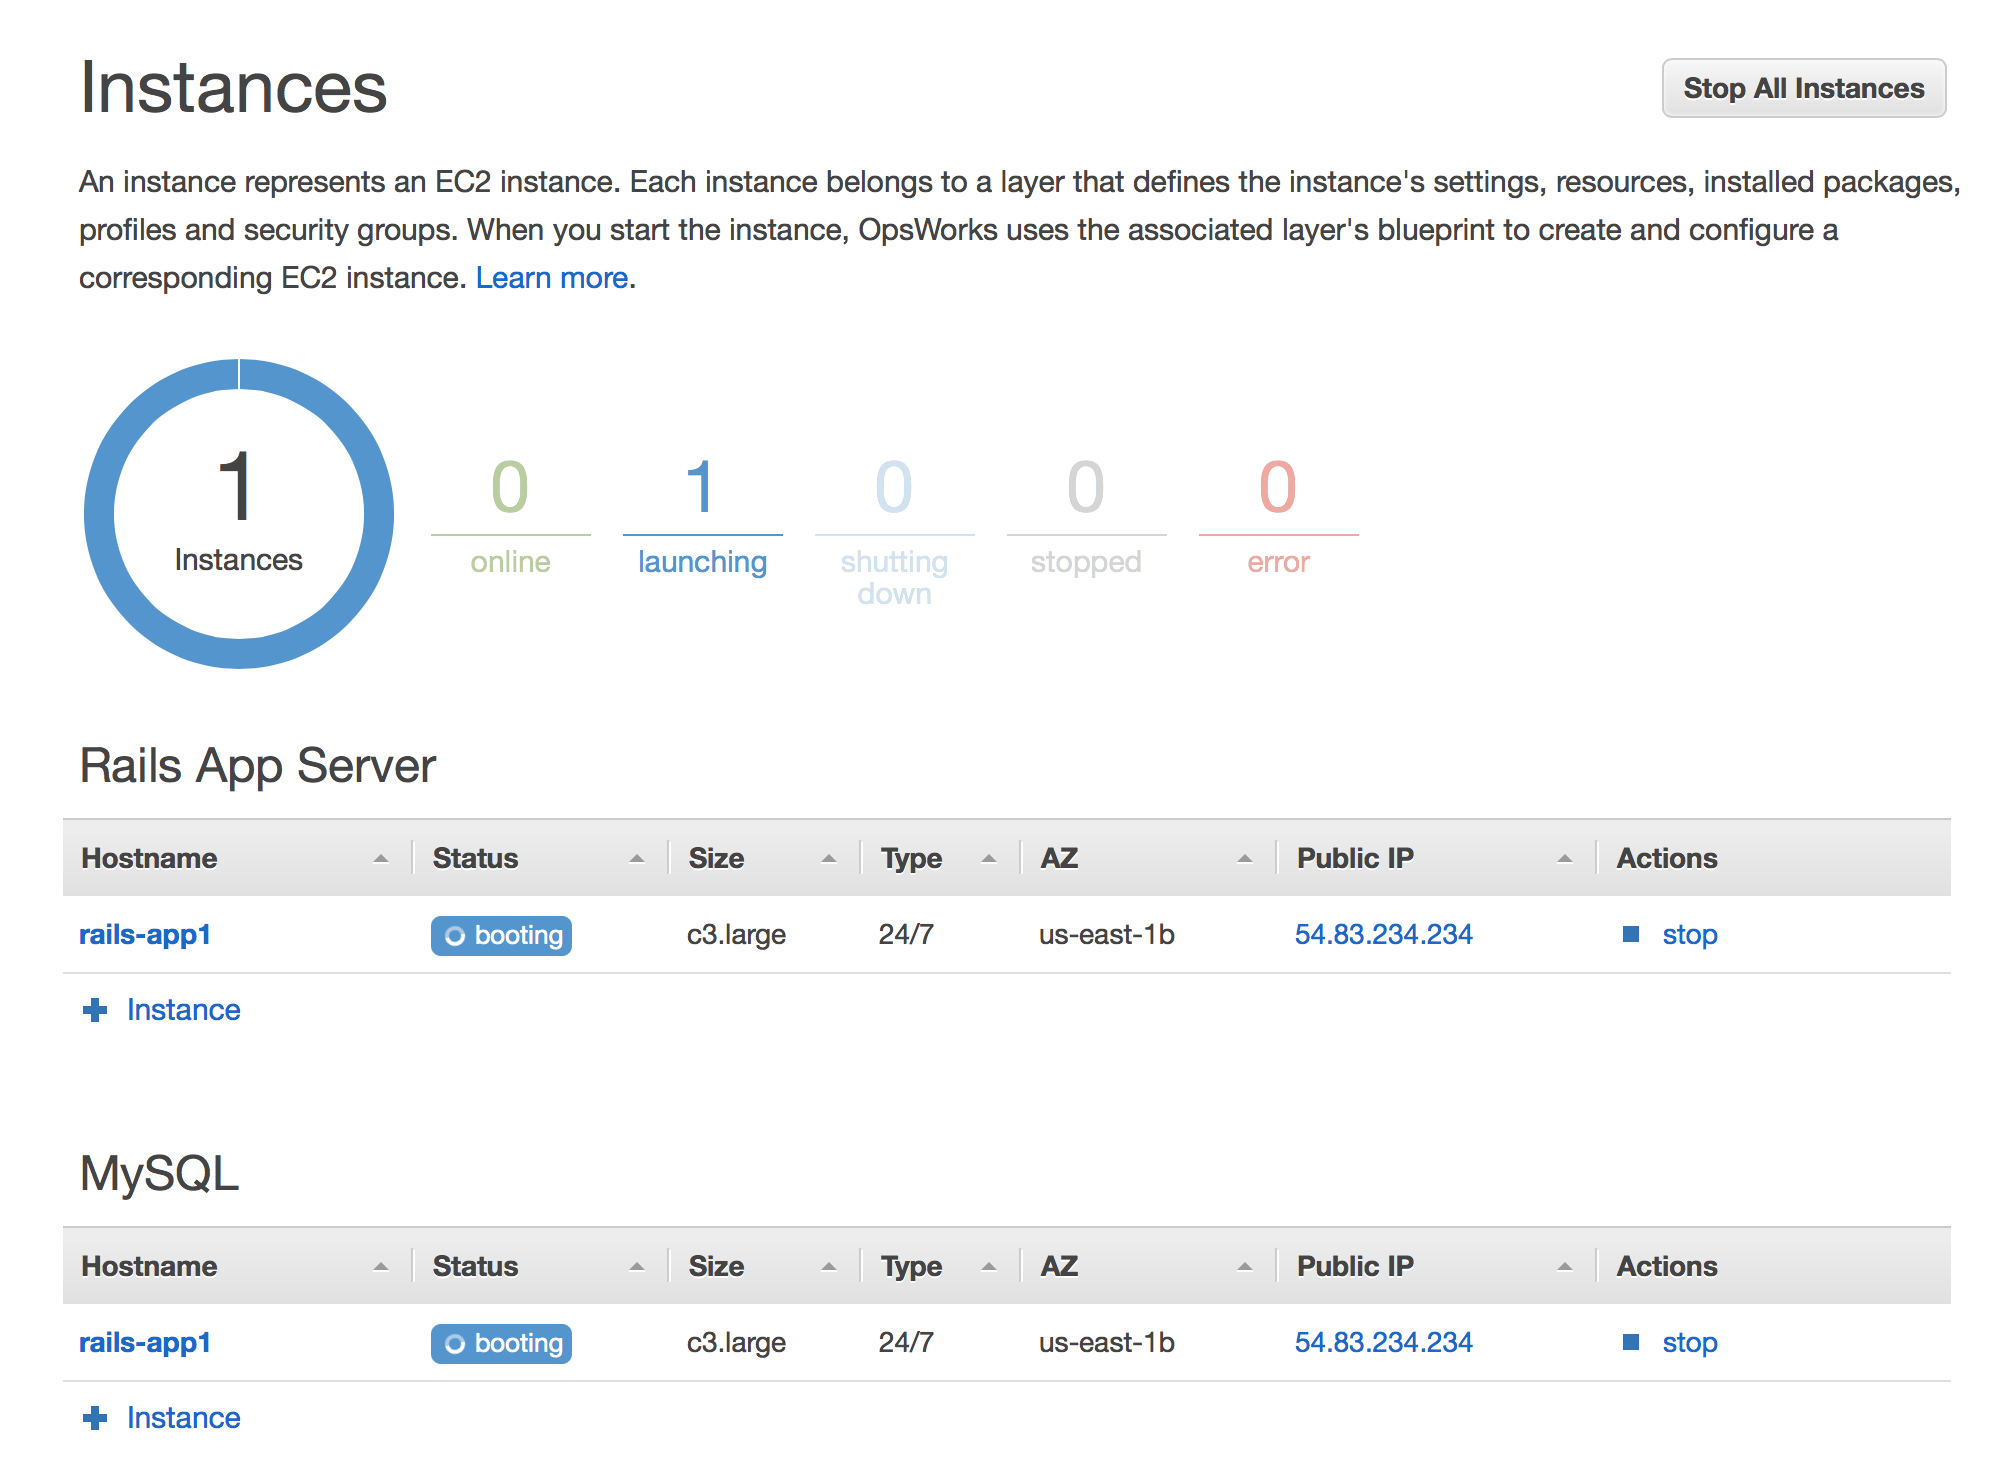
5. Create an instance
We’ve configured the software that will run on the server. Next we create the instance itself, which is the server that will run our application. Use the Navigation menu to go to the Instances page. Click “Add an instance” under “Rails App Server”. Leave all the settings at their defaults.
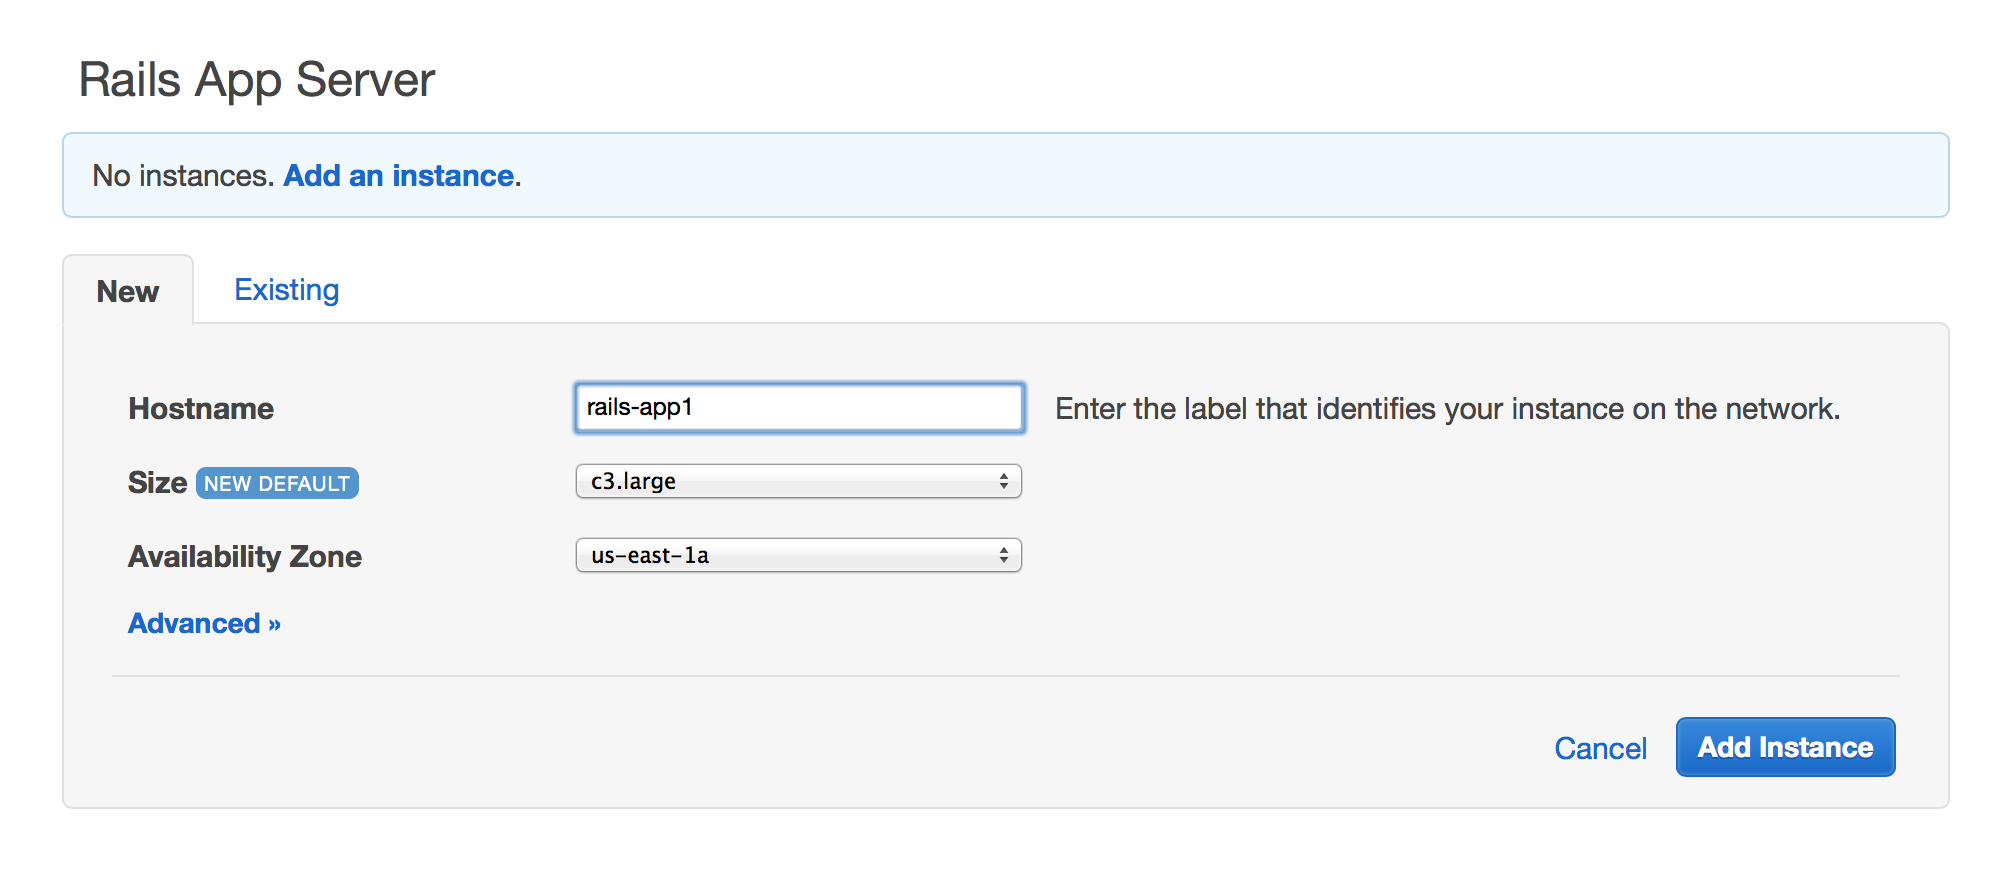
Click “Add Instance” to create the instance.
We are now going to add the MySQL layer to the instance we just created, so both the
Rails app and MySQL will run on the same instance. Click “Add an instance”
under “MySQL”. Choose the “Existing” tab and check the box next to your instance (rails-app1
in this case).
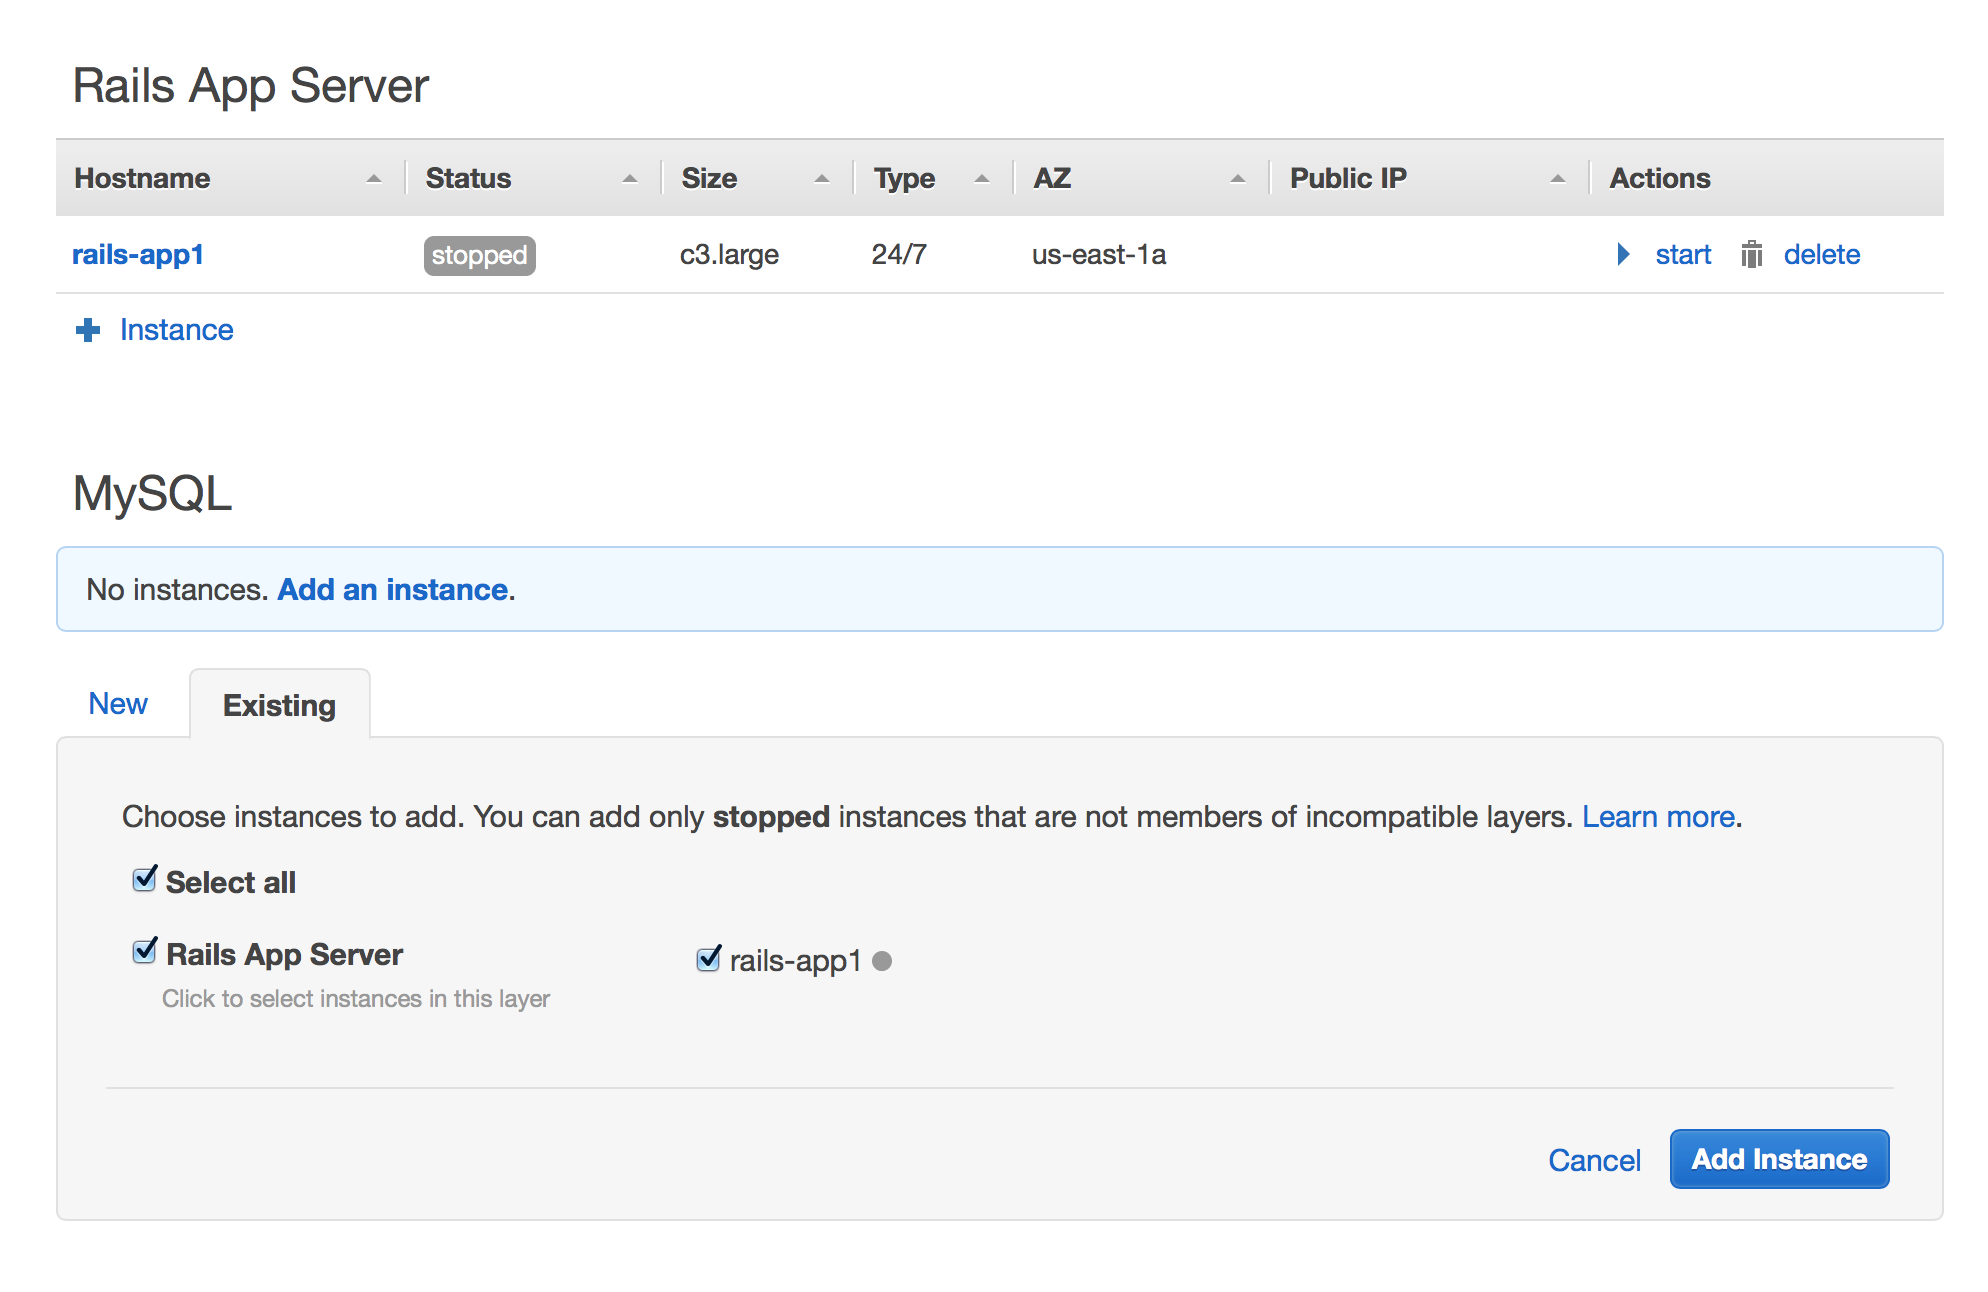
Click “Add Instance” to assign the MySQL layer to the Rails app instance.
6. Add an application
We’ve finished configuring our server, now it’s time to setup the application we are going to run on the server. Use the Navigation menu to go to the Apps page. Click “Add an app” to create an application. Leave settings at their default except:
-
Name: Choose a name for your application.
-
Data source type: Choose “OpsWorks”.
-
Database instance: Choose the instance we just created.
-
Application Source: There are many options to give OpsWorks access to your application’s source code. I use GitHub with a deploy key. You can also use Subversion, HTTP, or S3.
-
Environment Variables: Add any environment variables needed by your app here. Environment variables are one solution for managing Rails app secrets.
-
Domain name: You can leave this blank since we only have one app in the stack.
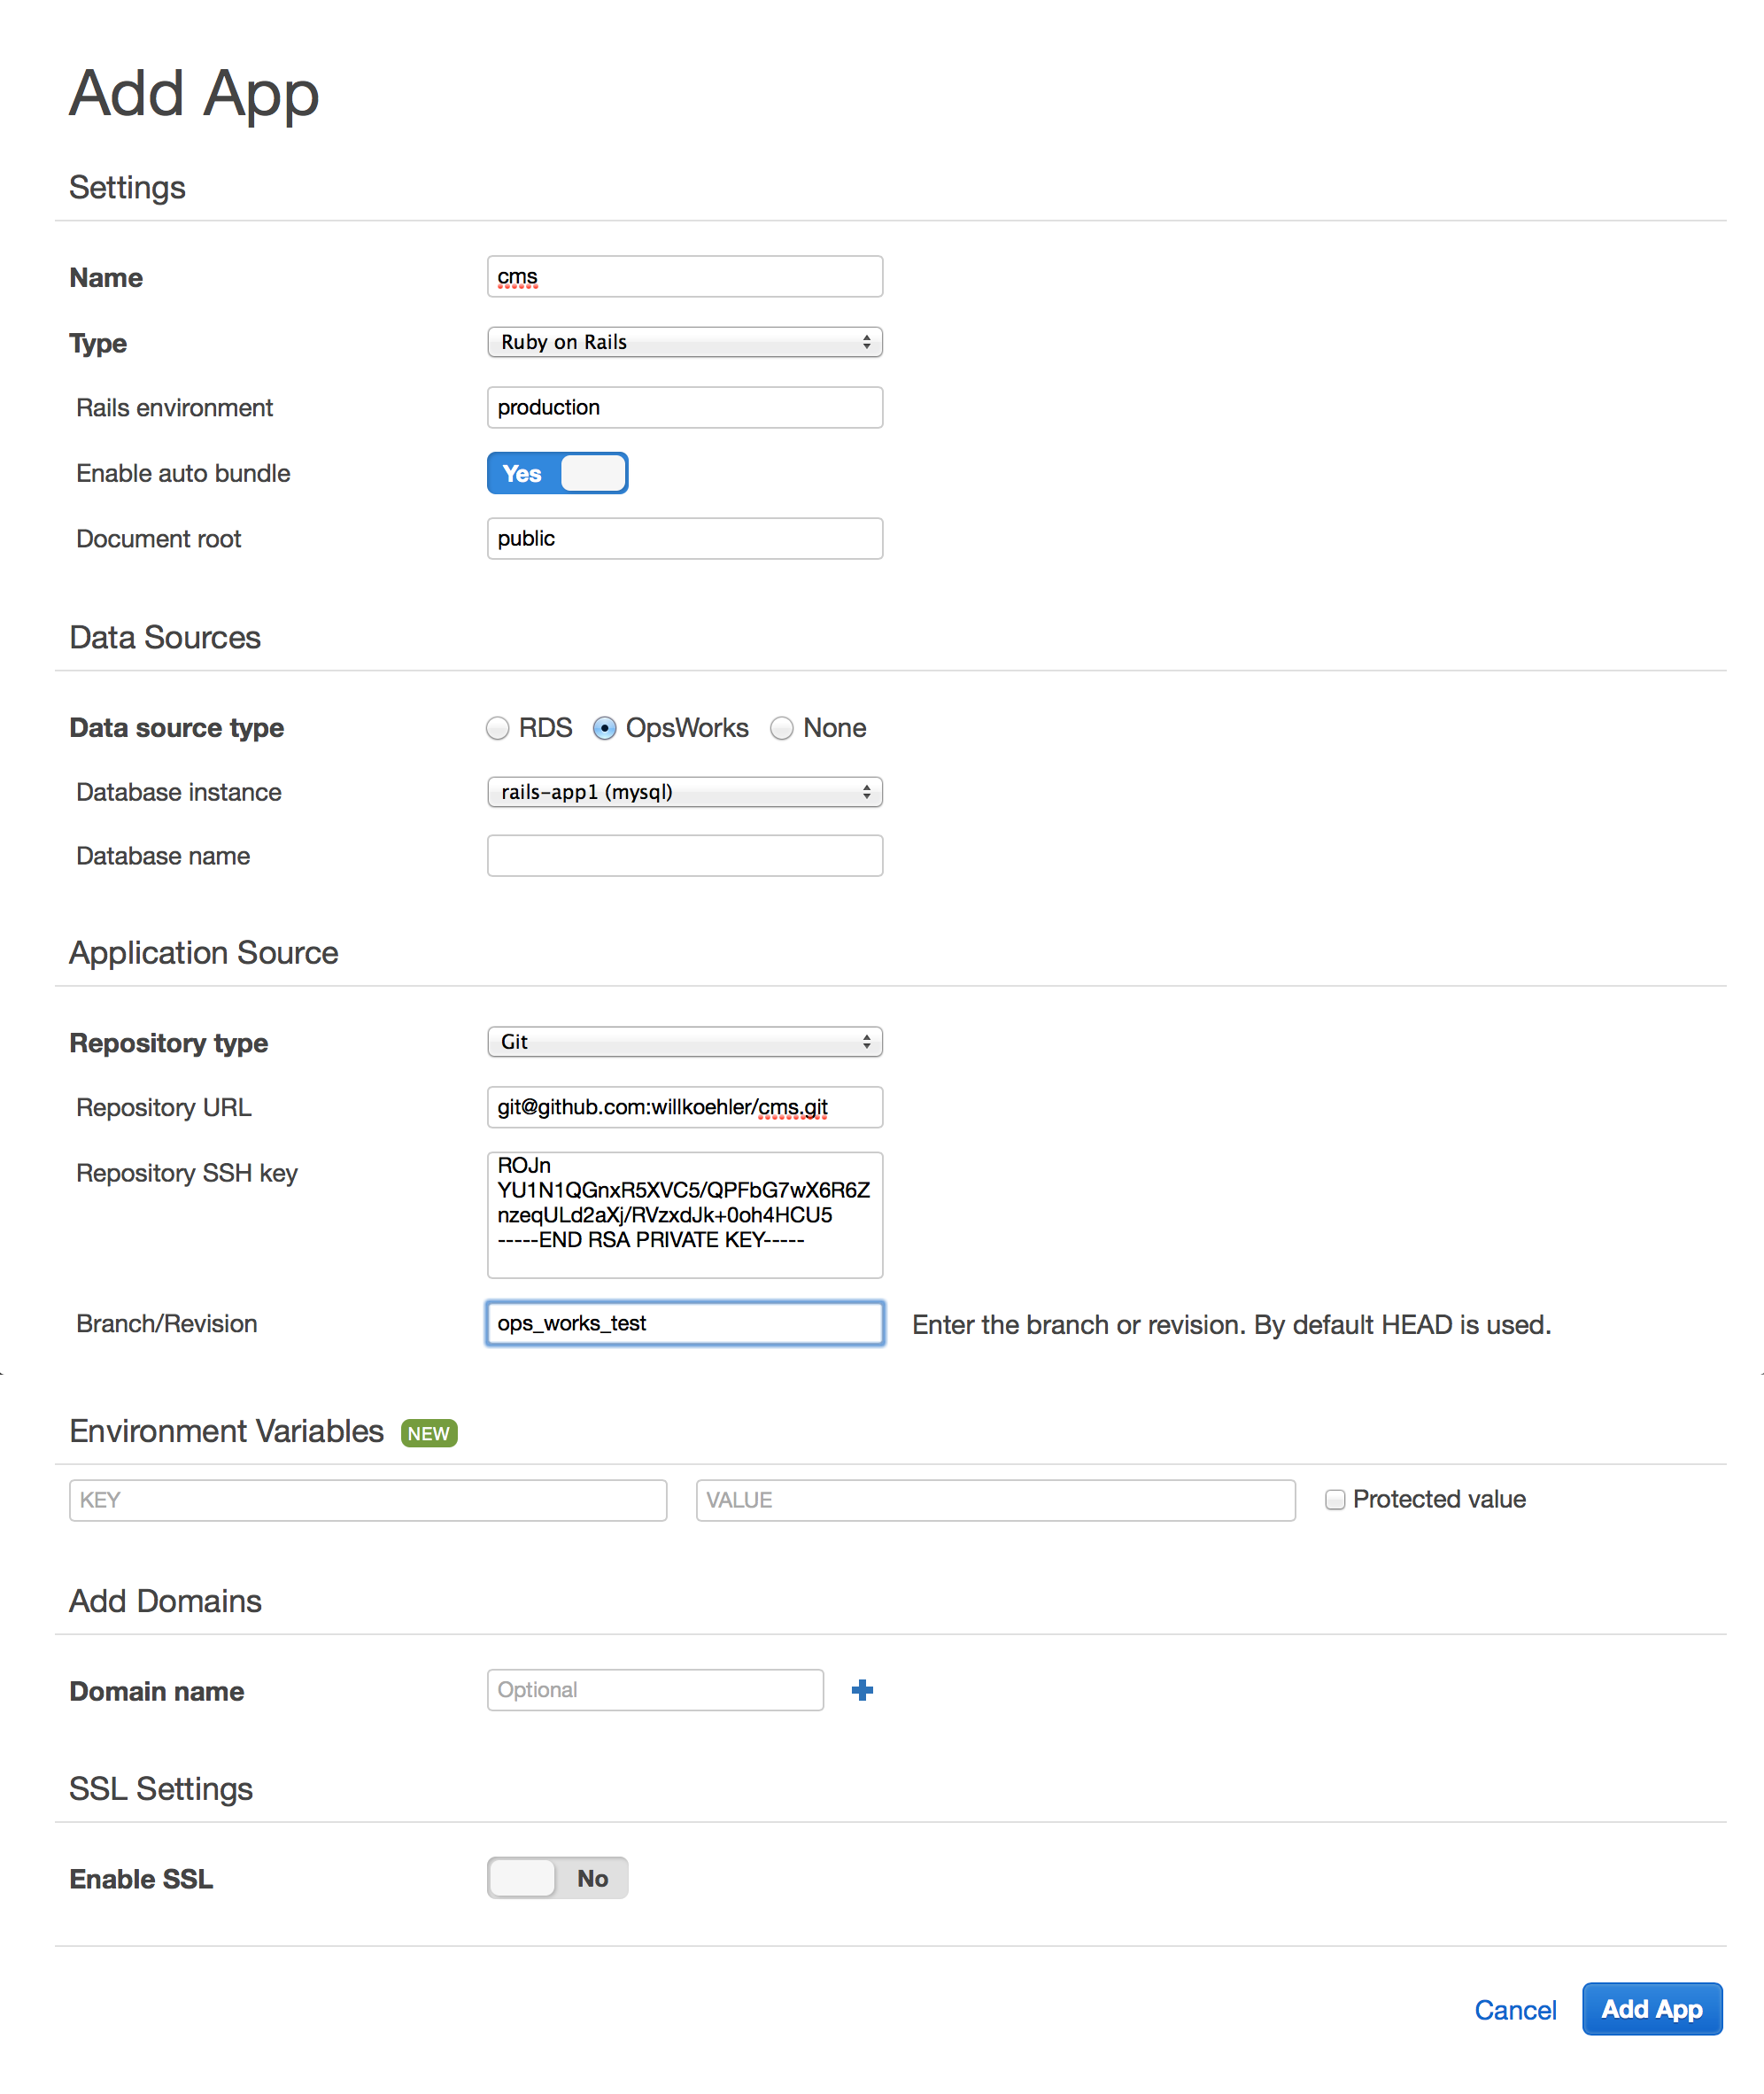
Click “Add App” to create the application.
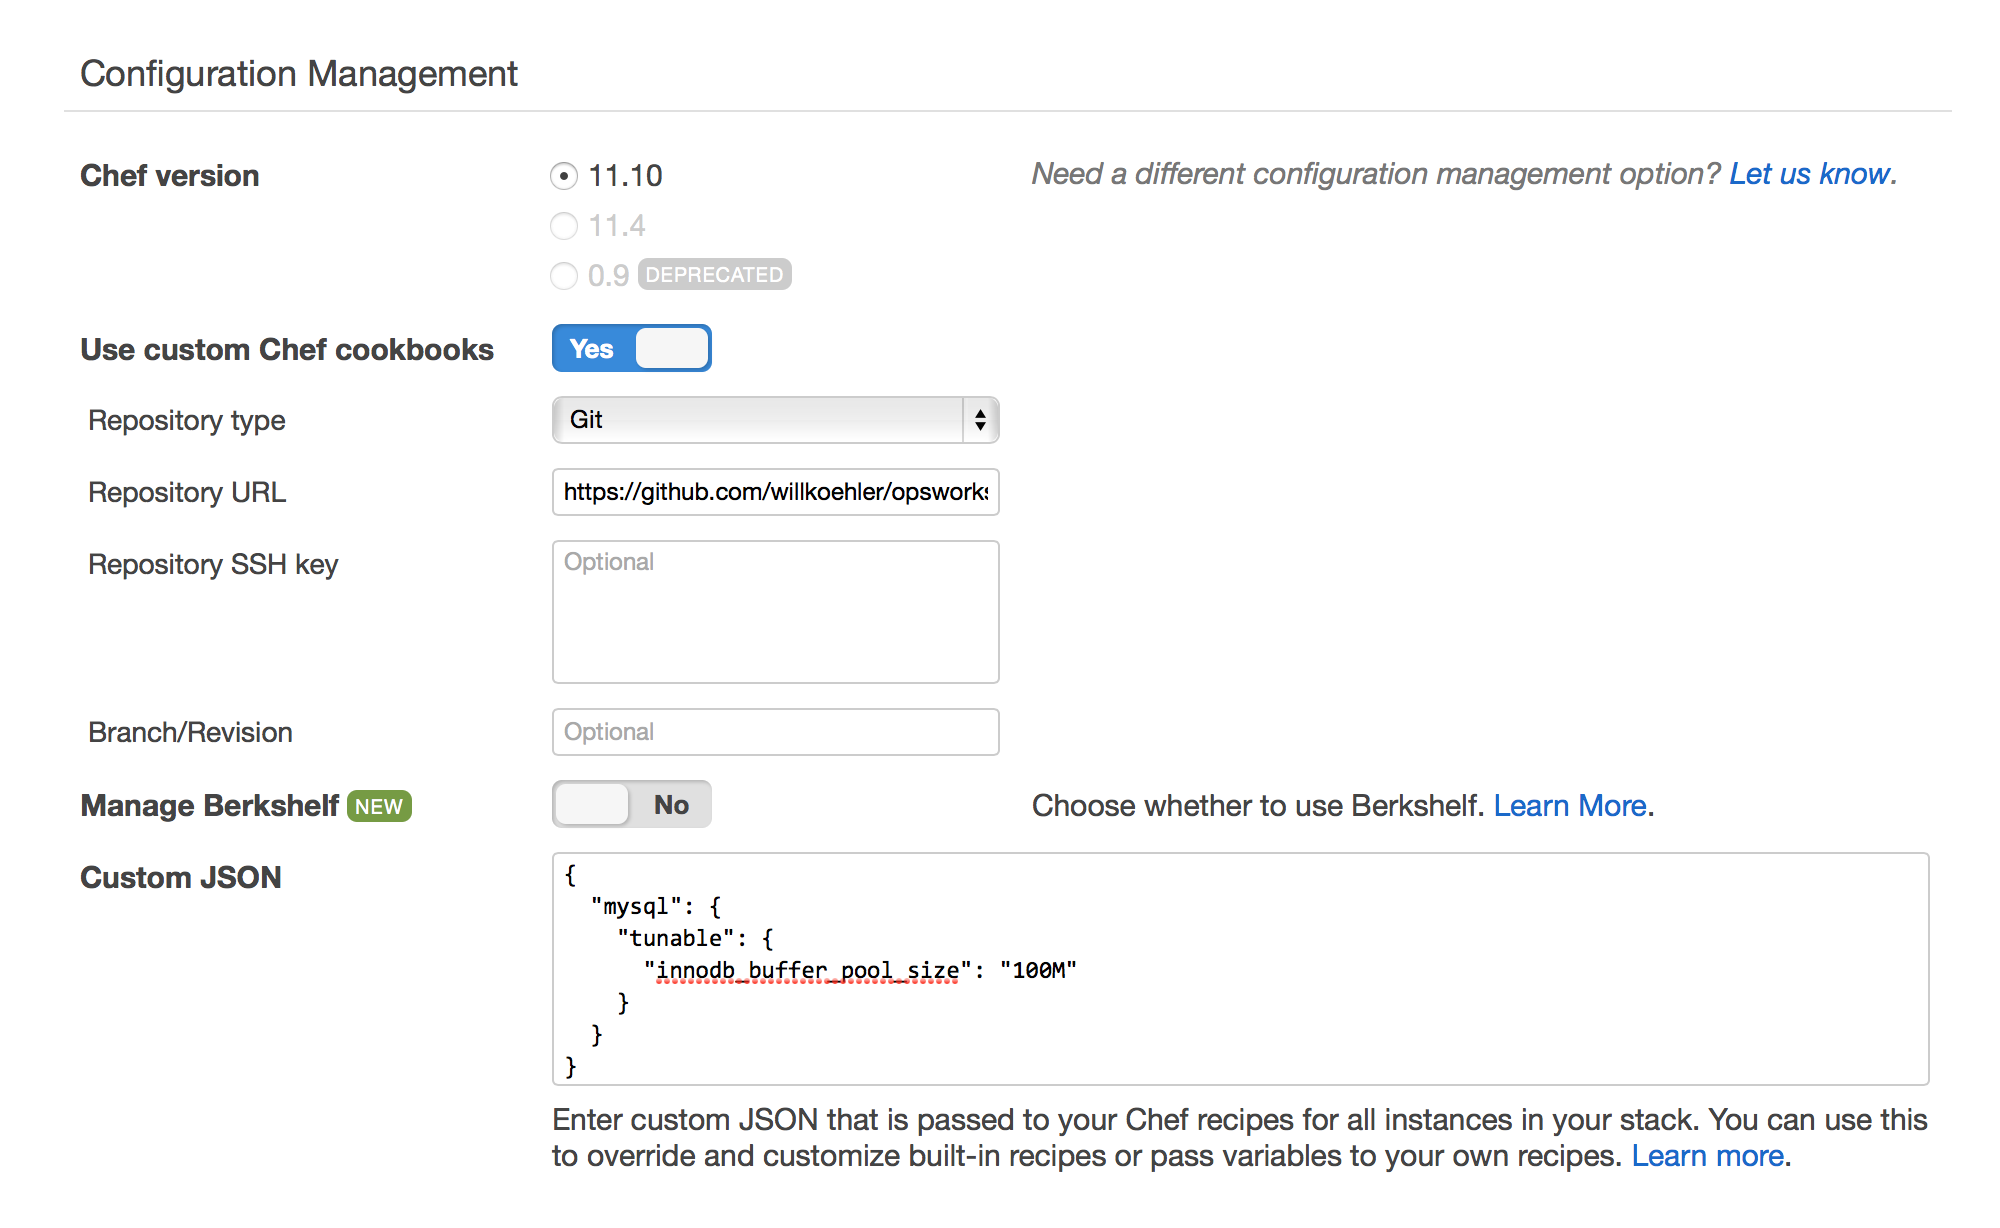
7. Adjust innodb_buffer_pool_size
The MySQL recipe in OpsWorks is optimized to run MySQL on a dedicated server. Out of the box a majority of the server memory will be allocated to MySQL. Depending on the instance size, the combination of Rails workers and MySQL may exhaust memory and the instance will fail to start.
To fix this, we need to reduce innodb_buffer_pool_size. Use the Navigation menu to go to the
Stack page. Click “Stack Settings” and then “Edit”. Under “Configuration Management” add the
following Custom JSON
{
  "mysql": {
    "tunable": {
      "innodb_buffer_pool_size": "100M"
    }
  }
}
The specific size of innodb_buffer_pool_size depends on your application and instance size.
For a small, single-server application 100 megabytes should be plenty.
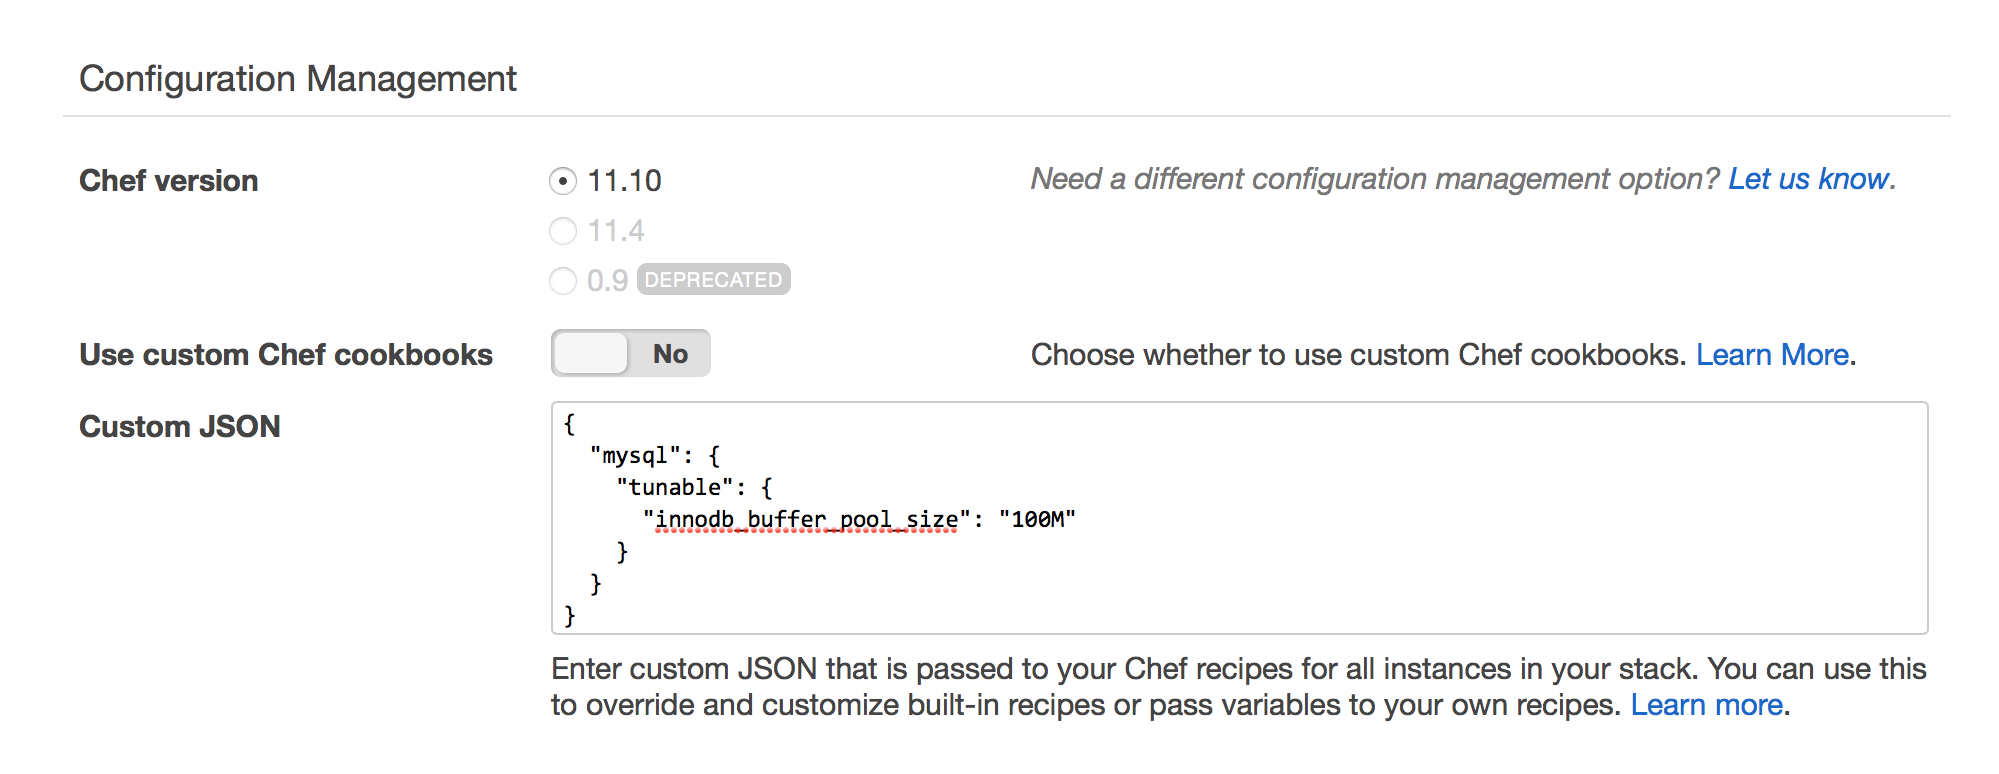
Click “Save” to save your changes.
8. Enable far-future cache headers
For best performance, it’s recommended to set “far-future” headers on your assets, effectively
instructing the browser to cache the assets forever. Unfortunately OpsWorks doesn’t do this out of the
box and there’s no clean way to add it. The only solution I’ve found is to create a custom cookbook,
copy nginx_unicorn_web_app.erb from the AWS cookbook and customize it to add the correct asset headers.
To incorporate this updated recipe into our application, we need to edit the stack settings and add a custom cookbook. Use the Navigation menu to go to the Stack page. Click “Stack Settings” and then “Edit”. Under “Configuration Management”, turn on “Use custom Chef cookbooks” and point it to my custom OpsWorks cookbook https://github.com/willkoehler/opsworks-cookbooks.git
This cookbook also disables delete_cached_copy so that a cached copy of the app code is kept
between deploys, speeding up deployment.
Click “Save” to save your changes.
9. Start the instance
Now everything is ready to go. Let’s start our instance. This will provision the server, boot it, and install all the software needed to run our app.
Use the Navigation menu to go to the Instances page. Click “Start All Instances”. It will take ~10 minutes to boot and configure the server.
10. Deploy the app
Once the instance is online, we can deploy the app. Use the Navigation menu to go to the Apps page. Click “Deploy” under Actions for your app. Enable “Migrate database” so OpsWorks sets up the database structure during the deployment.

Click “Deploy” to start the deployment.
11. Login via SSH
We’re almost done. But, depending on your app, there may be a few steps that need to be done by hand via SSH after the first deploy.
For example, my app has database seeds. OpsWorks creates the database structure but it doesn’t do anything else. To seed the database you must login via SSH.
You will need the SSH key you assigned to the stack earlier. You also need the public IP address of the instance, which you can get from the Instances page.
SSH into the instance:
ssh -i your-private-key ubuntu@your_domain_or_ip_addressOpsWorks creates a deploy user to deploy and manage the Rails application. Any application
work you do on the server should be done as the deploy user. In this case I’m going to seed
the database.
sudo su deploy
cd /srv/www/your_app_name/current/
RAILS_ENV=production bundle exec rake db:seed
Ready to go
That’s everything. Point your browser to the public IP and your app should be live. If you have
problems, check the production log: /srv/www/your_app_name/shared/log/production.log
Future deployments
Future deployments are easy. Check in your code and push to your deploy repo/branch. Use the Navigation menu to go to the Apps page. Click “Deploy” under Actions for your app.
Upcoming posts
I wanted to keep this post focused on the core steps to deploying a Rails app. But there’s more to cover. I have two more posts coming up:
- Use Snapshots for MySQL Backup in AWS OpsWorks
- Manage Your App’s secrets.yml with AWS OpsWorks
